from collections import Counterimport datetime as dtfrom pathlib import Pathfrom urllib.request import urlretrieveimport geopandas as gpdimport pandas as pdPROJECT_DIR = Path(".").resolve()PROJECT_DATA_DIR = PROJECT_DIR.joinpath("data")
Great Expectations (or GX for short) is an open-source Python-based library that brings the idea of “testing” to your data. It enables you to define expectations for properties of your datasets (like records per batch, distribution of values in a column, columns in a table, etc) and check that the data meets those expectations when the data is updated.
Workflow Overview
The high-level great_expectations workflow follows this pattern:
In this post, I’ll demonstrate this workflow with local-file-based DataAssets in a local filesystem DataContext (although great_expectations also works with SQL-based and cloud-bucket-based DataAssets).
Sample Data Collection and Preparation
Many data pipelines process data in discrete, periodic batches. I’m going to simulate that situation by downloading a dataset, splitting it into 1-month batches (based on a datetime-like column), and then write each of those 1-month batches to file. I’m going to use the Food Inspection dataset on Chicago’s public data portal.
Step 0: Great Expectations Setup
First, you’ll need to install the great_expectations. If you already have conda installed on your machine, you can easily set up a conda env just like the one used to run this notebook by: 1. copying the gx_env_environment.yml file in the same dir as this notebook file to your machine, 2. open a terminal and navigate to the dir with that new file, and 3. run command conda env create -f environment.yml
Collecting and preprocessing sample data for this post
PROJECT_DATA_DIR.mkdir(exist_ok=True)# First, we need to download the data to our local machine.url ="https://data.cityofchicago.org/api/geospatial/4ijn-s7e5?method=export&format=GeoJSON"full_file_path = PROJECT_DATA_DIR.joinpath("full_food_inspections.geojson")ifnot full_file_path.is_file(): urlretrieve(url=url, filename=full_file_path)food_inspection_gdf = gpd.read_file(full_file_path)# For some reason, Socrata adds on these four always-null location columns on# to geospatial exports. I'm going to remove them.location_cols = ["location_state", "location_zip", "location_address", "location_city"]# uncomment the lines below to confirm those columns are always empty# print("Rows with a non-null value in these location_xxx columns:")# display(food_inspection_gdf[location_cols].notnull().sum())food_inspection_gdf = food_inspection_gdf.drop(columns=location_cols)# That column ordering is a bit chaotic, so I'll reorder them (for readability).col_order = ["inspection_id", "inspection_date", "dba_name", "aka_name", "license_", "facility_type","risk", "inspection_type", "results", "address", "city", "state", "zip", "violations","longitude", "latitude", "geometry"]food_inspection_gdf = food_inspection_gdf[col_order].copy()# I also want to break this into batches based on the dates, so I need to cast# the `inspection_date` to a datetime type.food_inspection_gdf["inspection_date"] = pd.to_datetime( food_inspection_gdf["inspection_date"])# I'll also cast string and numeric features to their proper dtypes.# food_inspection_gdf = food_inspection_gdf.convert_dtypes()food_inspection_gdf["inspection_id"] = food_inspection_gdf["inspection_id"].astype("Int64")food_inspection_gdf["longitude"] = food_inspection_gdf["longitude"].astype(float)food_inspection_gdf["latitude"] = food_inspection_gdf["latitude"].astype(float)# I'll also just make all string uppercase (to reduce cardinality)str_cols =list(food_inspection_gdf.head(2).select_dtypes(include="object").columns)food_inspection_gdf[str_cols] = food_inspection_gdf[str_cols].apply(lambda x: x.str.upper())
In the (folded up) cell below, we split the dataset into batches and write each batch to file in this post’s ./data directory.
And here we split the dataset into batches and write each batch to file in this post’s ./data directory.
# I want to split the data into 1-month batches, so I need to get the first day of the month# for every month between the earliest inspection and the month after the latest inspection# in our food inspection dataset.month_start_dates = pd.date_range( start=food_inspection_gdf["inspection_date"].min() + pd.DateOffset(months=-1), end=food_inspection_gdf["inspection_date"].max(), freq="MS",)# Here, we'll iterate through each of those month_start_dates, extract the batch of data,# format a filename containing the month_start_date, and write the batch to file.for month_start_date in month_start_dates: batch_period = pd.to_datetime(month_start_date).strftime("%Y_%m") batch_data = food_inspection_gdf.loc[ food_inspection_gdf["inspection_date"].between( left=month_start_date, right=month_start_date + pd.DateOffset(months=1), inclusive="left") ].copy() batch_file_path = PROJECT_DATA_DIR.joinpath(f"food_inspection_batch_{batch_period}.parquet")ifnot batch_file_path.is_file(): batch_data.to_parquet(batch_file_path, index=False)
Step 1: Create or Load Great Expectations DataContext
A DataContext is your primary tool for configuring your project and accessing project resources or GX methods. When you first create a DataContext for your project, GX will create a directory named /great_expectations in the project_root_dir directory.
The code below will create a new DataContext if one doesn’t already exist in the PROJECT_DIR directory, and then load a DataContext instance from that PROJECT_DIR. Great Expectations defaults to collecting anonymized usage statistics, but you can disable that for your context by setting usage_statistics_enabled=False.
import great_expectations as gxfrom great_expectations.data_context import FileDataContextcontext = FileDataContext.create(project_root_dir=PROJECT_DIR, usage_statistics_enabled=False)
This tutorial uses a local FileDataContext, but GX also supports CloudDataContexts and EphemeralDataContexts.
Kinds of DataContexts
[el for el indir(gx.data_context) if el.endswith("Context")]
A GX Datasource connects you to a source of data and gives you methods to define and access DataAssets.
The code below will check the DataContextcontext for a Datasource with the given datasource_name, and either load or create a local filesystem Datasource instance.
datasource_name ="food_inspection_datasource"ifany(el["name"] == datasource_name for el in context.list_datasources()):print(f"Datasource with name '{datasource_name}' found; loading now") datasource = context.get_datasource(datasource_name)else:print(f"No Datasource with name '{datasource_name}' found; creating now") datasource = context.sources.add_pandas_filesystem( name=datasource_name, base_directory=PROJECT_DATA_DIR )
No Datasource with name 'food_inspection_datasource' found; creating now
Other kinds of GX Datasources
[el for el indir(context.sources) if el.startswith("add_") and"_update_"notin el]
A GX DataAsset specifies a collection of records in a Datasource and the method for accessing those records.
The code below checks if a DataAsset with the given name exists in the datasource, loading it if it exists, or specifying it if not. In the part that specifies the DataAsset, note that we set the name of the asset, specify that the data is in parquet files, and provide a regex pattern for the file_names and also defines variable-names for the year and month parts each file_name. We can use those year and month variables to specify how DataAssets should be split into batches and the order of those batches.
A GX Expectation is a verifiable assertion about some property of a DataAsset, and defining Expectations both enables GX to check that data meets expectations and enables domain experts to explicitly represent and communicate Expectations for data.
GX supports hundreds of different Expectations and catalogs them in the Expectation Gallery (although not all Expectations are implemented for all kinds of Datasources). GX also provides tools to aid in several workflows for defining suites of Expectations, including the GX Data Assistant workflow (used below), which builds a suite of Expectations by profiling batches of data.
In the code below, we create a new Expectation suite (on lines 3-5), organize batches of data (on lines 6-7), and use the data assistant to profile the DataAsset based on our batches of data (on lines 8-11).
64 Expectations produced, 23 Expectation and Metric plots implemented
Use DataAssistantResult.show_expectations_by_domain_type() or
DataAssistantResult.show_expectations_by_expectation_type() to show all produced Expectations
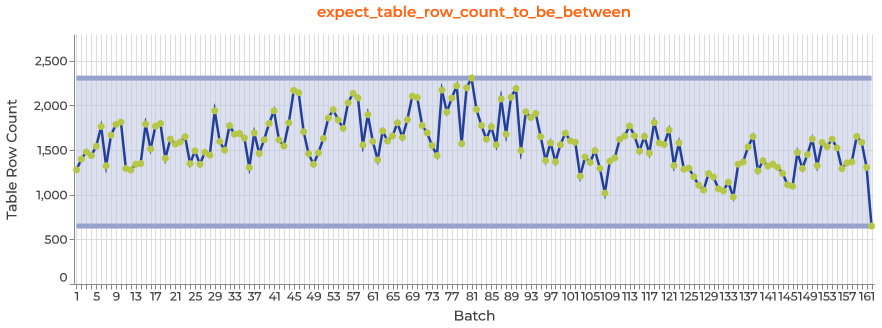
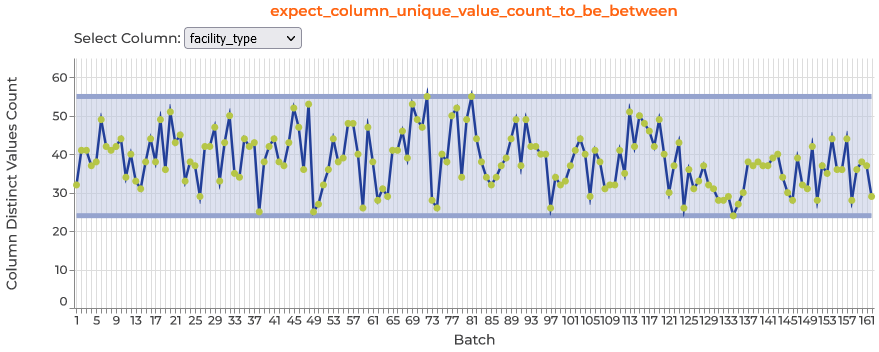
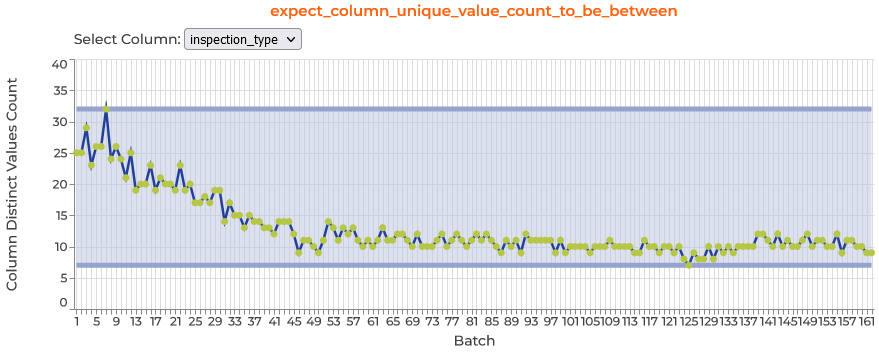
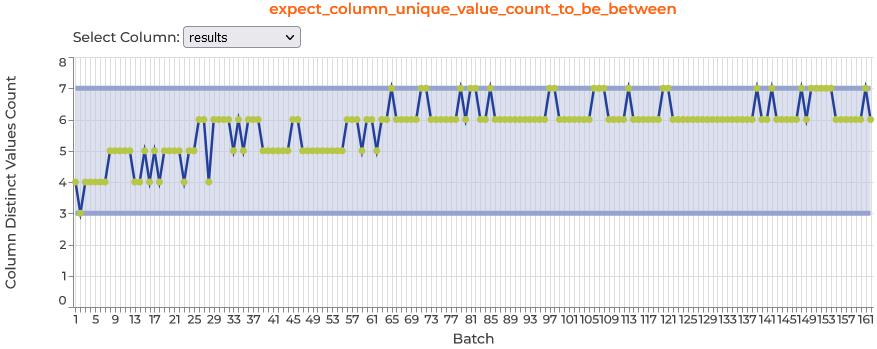
Data Assistant Plot Inspector plots
After the Data Assistant finishes profiling, it outputs results to a variable we named data_assistant_result, and you can explore the results across batches by calling data_assistant_result.plot_expectations_and_metrics() and selecting the expectation and column you’re interested in.
Extracting, [optionally] Editing, and Committing our Expectation Suite to our DataContext
If we’re content with the Expectations generated by the Data Assistant’s profiler, we can simply extract the Expectations and add them to our context via
print(f"Counts of Expectations by Expectation-type:")expecs_by_type = expectation_suite.get_grouped_and_ordered_expectations_by_expectation_type()display(Counter([ex._expectation_type for ex in expecs_by_type]))
print(f"Counts of Expectations by Column-name:")expecs_by_col = expectation_suite.get_grouped_and_ordered_expectations_by_column()expec_count_by_col = {col: len(col_expecs) for col, col_expecs in expecs_by_col[0].items()}display(sorted(expec_count_by_col.items(), key=lambda x: x[1], reverse=True))
Some Expectations are redundant, such as expect_column_min_to_be_between and expect_column_max_to_be_between. I’ll remove them.
col_name ="longitude"expectation_types_to_remove = ["expect_column_min_to_be_between", "expect_column_max_to_be_between"]col_expectations_w_type = [ ex for ex in expectation_suite.get_column_expectations()if (ex["kwargs"]["column"] == col_name) and (ex["expectation_type"] in expectation_types_to_remove)]col_expectations_w_type
print(f"Expectations prior to removal: {len(expectation_suite.expectations)}")for expectation_to_remove in col_expectations_w_type: removed_expec = expectation_suite.remove_expectation(expectation_to_remove)print(f"Expectations after removal: {len(expectation_suite.expectations)}")
Expectations prior to removal: 64
Expectations after removal:    62
We can also get rid of every instance of an Expectation type.
print(f"Removing Expectation types:")for expec_type in expectation_types_to_remove:print(f" - {expec_type}")print(f"Expectations prior to removal: {len(expectation_suite.expectations)}")removed_expecs = expectation_suite.remove_all_expectations_of_type(expectation_types=expectation_types_to_remove)print(f"Expectations after removal: {len(expectation_suite.expectations)}")
Removing Expectation types:
  - expect_column_min_to_be_between
  - expect_column_max_to_be_between
Expectations prior to removal: 62
Expectations after removal:    60
After reviewing and editing Expectations, the Expectation Suite must be committed to the DataContext.
A GX Checkpoint configures the validation process for an Expectation Suite.
Specifically, a Checkpoint defines: * the Expectation Suite to evaluate, * the data Batches to evaluate against, and * the actions to take after evaluation.
We’ll take the actions of compiling a report of results and committing our Checkpoint to our DataContext, but you can also configure a Checkpoint to send results via a email or Slack notification.
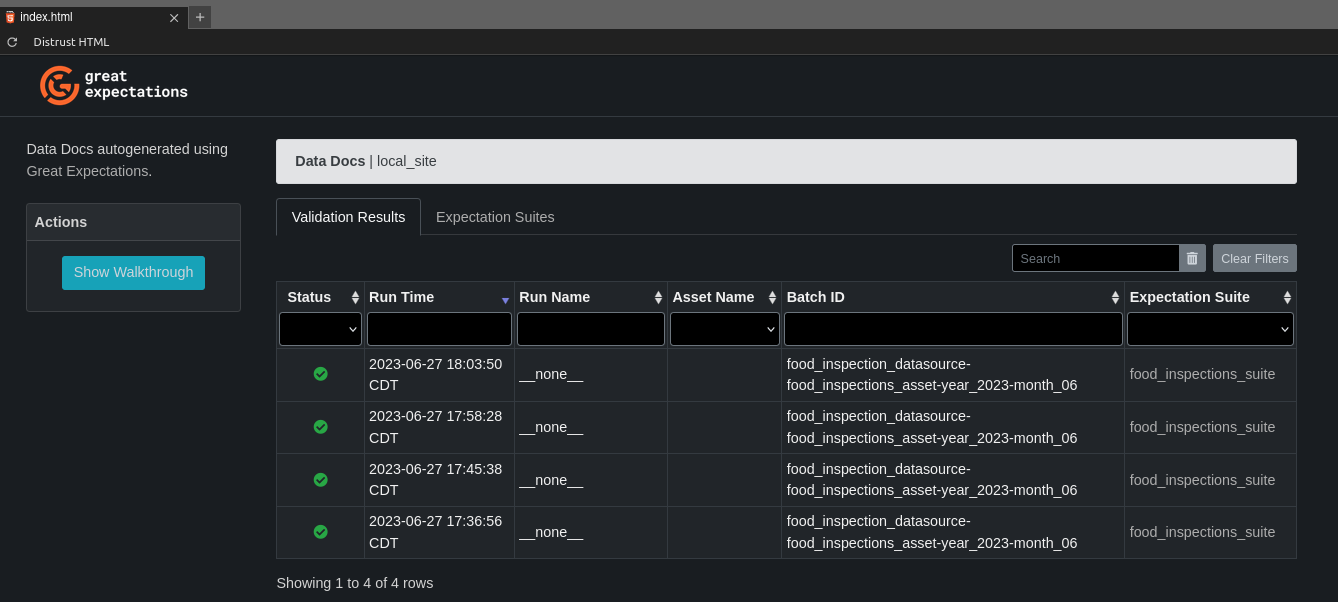
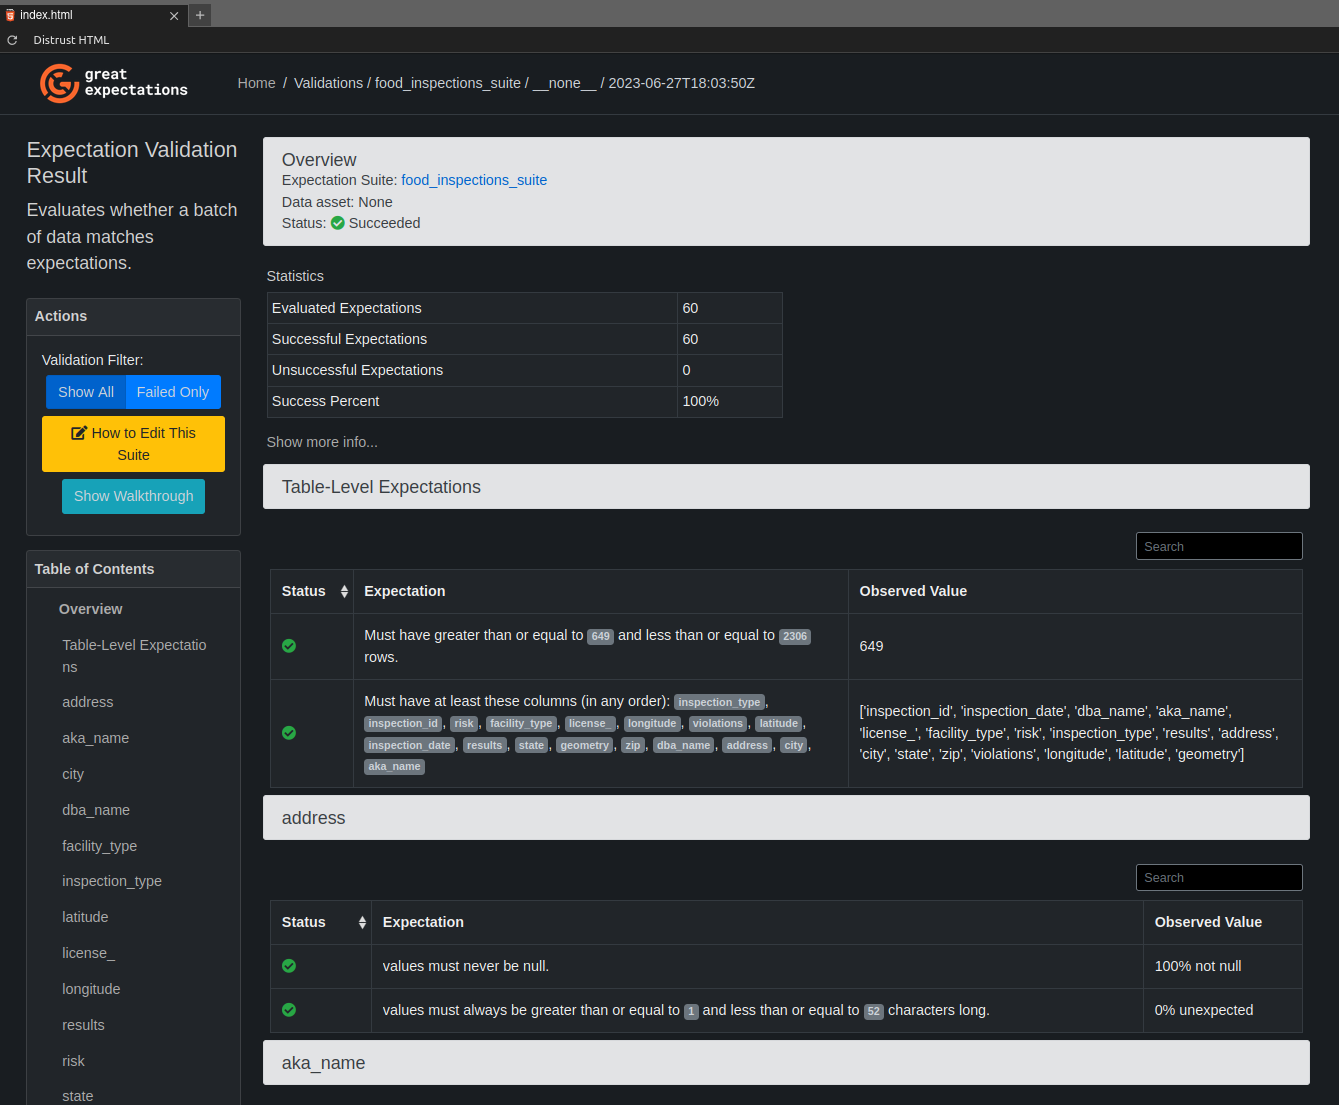
To view the generated validation report (or Data Docs), open the file .../great_expectations/uncommitted/data_docs/local_site/index.html and select the validation run you want to review. You may have to click Trust HTML (upper left corner in Jupyterlab) to navigate the document.
You can easily integrate a defined Checkpoint into a pipeline with just a few lines of code (and another dependency).
import great_expectations as gxcontext = gx.get_context(context_root_dir=PROJECT_DIR.joinpath("great_expectations"))retrieved_checkpoint = context.get_checkpoint(name="food_inspections_checkpoint")retrieved_checkpoint_result = retrieved_checkpoint.run()ifnot retrieved_checkpoint_result["success"]:print(f"Failed Validation Checkpoint!")# or raise Exception("if you'd rather handle validation failures that way")
Summary
In this notebook, we’ve built some data infrastructure that helps communicate some expectations for our data to data users and enables us to check that those expectations are still being met after every update.
Next Steps
In future posts, I’ll dive deeper into the Expectation-setting process, demonstrate a workflow with a PostgreSQL Datasource and DataAssets (where GX really shines), and explore strategies for integrating data monitoring into production ETL/ELT pipelines (like those in my personal data warehousing platform).